Showing posts with label iOS. Show all posts

Tuesday, March 14, 2017

Record iPhone or iPad Device Screen and Capture App Log in Mac

Recording device(iPhone/iPad) Screen
 
Sometimes we need to record the mobile device screen for reference of bug verification or capturing an automation run. Recording the device screen is not a difficult step.

There is a default app in Mac by which you can easily record your iPhone or iPad screen. So you don't need to install any other app to do this. The default app which does this is "QuickTime Player"

Steps to record screen:
  • Plug-in the iPhone/iPad device to your Mac
  • Open "QuickTime Player" in your Mac
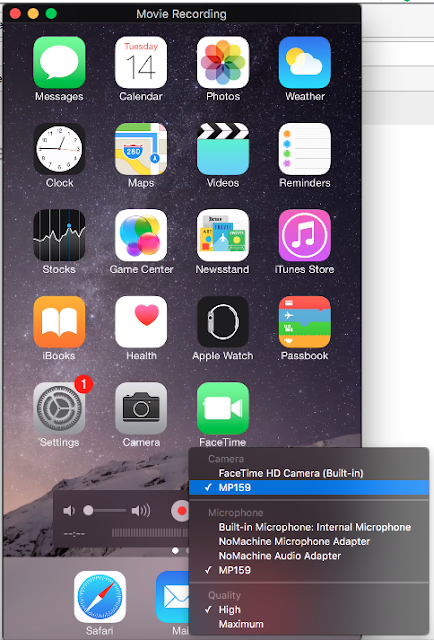
  • Start a new movie recording(Right click on the icon from the Dock > select "New Movie Recording")
  • On the record menu(arrow right to the red circle) select the device id under the Camera and Microphone section) - as shown in the below image
  • The screen now should be resized to the device screen size
  • Click on the record button(red circle) to start the recording
  • Do any actions that you want to perform in the device to record
  • Click on the stop recording button when you want to stop
  • Save the recording with a name in your local drive
 Note: You can adjust the volume in the volume bar based on the requirement.


Capturing app log in device(iPhone/iPad)

For capturing the application log in the iPhone/iPad device we should have "Xcode" installed in the Mac. Many mac has Xcode installed by default, if not installed then you will have to install it.

Steps to capture log:
  • Plug-in the iPhone/iPad device to your Mac 
  • Open "Xcode" in the system
  • Navigate to "Window" menu and select "devices"
  • In the devices window, select the device name/id from the left panel under the devices
  • In the right panel, click(if the log is not visible) on the upward arrow which shows at the bottom of the right panel of the device window.
  • You will see the running application log in the log panel
  • Clear the log by clicking on the "Clear console" image icon when you don't want the previous log.
  • Click on the "Save Console" image icon to save the log


Capturing screenshots in device(iPhone/iPad)

You can capture the device screenshot in many ways. Below are 2 easy ways to capture screenshot.
  1. Open the device window in Xcode as per the image shown above(follow the previous steps), then click on the "Take Screenshot" button. You will find the screenshot saved in the Desktop.
  2. Press and hold the Sleep/Wake button on the top or side of your device. Immediately press and release the Home button. To find your screenshot, go to the Photos app > Albums and tap Camera Roll.
Note: If you want to take log/screenshot from a simulator, you can select a simulator from the SIMULATORS section and proceed with the required steps.

Tuesday, December 15, 2015

Set up Appium for beginners (Android & iOS)

Appium is an open source test automation tool to automate native and hybrid mobile apps. For more details about the tool please go through http://appium.io/

Below are the steps for setting up Appium in your test machine (with Eclipse):

Step-1: Install Java
Ensure you have java installed in your machine. If not installed, please install it as per the below steps.
  1. Download latest java from http://www.oracle.com/technetwork/java/javase/downloads/index.html or from http://java.com/en/download/
  2. Double click on the downloaded file and follow the instructions to finish the installation. Please note the installation directory.
  3. Once java is installed, you need to set the path for java as follows
    For path setting in Windows,
    For path setting in Mac, please follow the below instructions
    • Look for ".bash_profile" in your home folder
    • If hidden files are not shown by default, you won't see this file. So execute below 2 command to show hidden files in mac
    defaults write com.apple.finder AppleShowAllFiles YES
    killall Finder
    
    • Start up Terminal
    • Type "cd ~/" to go to your home folder
    • Type "touch .bash_profile" to create your new file if ".bash_profile" doesn't exist
    • Edit ".bash_profile" with your favorite editor (or you can just type "open -e .bash_profile" to open it in TextEdit.
    • Update the file with the installed java home location as below example format
    set JAVA_HOME=/Library/Java/JavaVirtualMachines/jdk1.8.0_65.jdk/Contents/Home
    export JAVA_HOME=/Library/Java/JavaVirtualMachines/jdk1.8.0_65.jdk/Contents/Home
    export PATH=$PATH:${JAVA_HOME}:${JAVA_HOME}/bin
  4. To test java installation, open your command prompt(in windows) or terminal(in mac) and enter
  5. java -version
    • You will get the version of java you have installed as below example,
    java version "1.8.0_71"
    Java(TM) SE Runtime Environment (build 1.8.0_71-b15)
    Java HotSpot(TM) 64-Bit Server VM (build 25.71-b15, mixed mode)
    
Step-2: Download ADT bundle for Eclipse(Only if you want to test android application, not required for iOS application testing)
  1. You can download adt bundles (e.g. version 2014-07-02) from below sites:
  2. windows 32: https://dl.google.com/android/adt/adt-bundle-windows-x86-20140702.zip
    windows 64: https://dl.google.com/android/adt/adt-bundle-windows-x86_64-20140702.zip
    Mac 64: https://dl.google.com/android/adt/adt-bundle-mac-x86_64-20140702.zip
    Linux 86: https://dl.google.com/android/adt/adt-bundle-linux-x86-20140702.zip
    Linux 64: https://dl.google.com/android/adt/adt-bundle-linux-x86_64-20140702.zip
  3. Extract the downloaded zip file and extract them to a safe folder. Inside the folder you will find 2 folders. One is eclipse and another with SDK for android
  4. Set the PATH for android SDK. 
    • In Windows, create a system variable ANDROID_HOME and append the "tools" and "platform-tools" locations in PATH environment variable
    ANDROID_HOME=D://android/adt-bundle-windows-x86_64-20140702/sdk
    PATH=%ANDROID_HOME%//tools;%ANDROID_HOME%//platform-tools;
    • In Mac, append the below in ".bash_profile" file
    set ANDROID_HOME=/Applications/adt-bundle-mac-x86_64-20140702/sdk
    export ANDROID_HOME=/Applications/adt-bundle-mac-x86_64-20140702/sdk
    export PATH=$PATH:${JAVA_HOME}:${JAVA_HOME}/bin:${ANDROID_HOME}/tools:${ANDROID_HOME}/platform-tools
  5. Then you need to test sdk installation in the system. To do this, navigate to "platform-tools" directory inside sdk from command line or terminal and type command
  6. adb devices
    • You should get the below message in the terminal or command prompt
    * daemon not running. starting it now on port 5037 *
    * daemon started successfully *
    List of devices attached 
    
    • If you won't see "List of devices attached" message in the output, you might not set the sdk path properly. Please check the steps once again and correct the missing ones to get it properly.
  7. If you want latest android versions, open SDK manager and update the required android versions.
Step-3: Install Appium
  1. Open terminal and type below command
  2. sudo chown -R `whoami` /usr/local
    • Click the enter key and enter system password if it asks
    • Note: Sometimes in Mac system, you may get command not found error. Then please ensure the below is added in your ".bash_profile". You can addend at the end of file.
    export PATH=$PATH:/usr/sbin
    export PATH=$PATH:/usr/bin
    export PATH=$PATH:/usr/local/bin
  3. Next type the below command
  4. ruby -e "$(curl -fsSL https://raw.githubusercontent.com/Homebrew/install/master/install)"
    
    • Then click enter and follow the instructions to continue (provide system password is prompts)
    • Note: In mac machine, it may prompt for any dependant software (e.g. xcode) then please click on install, if you want to test an iOS application. If you want to test an android application you don't need to install it.
  5. Next install node by below command
  6. brew install node
    
    • and click enter. It downloads some files and installs them
    • To see node is installed successfully, please type below in command line
    node -v
    
    •  and click enter then you can see the version of the node installed
  7. Install appium by executing below command
  8. npm install -g appium
    
    •  and click enter, it will take some time to download all the appium related installations. 
  9. To test appium installation, use below command
  10. appium
    
    •  and click enter, it will show the version of appium running and will start the appium server from command line.
    info: Welcome to Appium v1.4.16 (REV ae6877eff263066b26328d457bd285c0cc62430d)
    info: Appium REST http interface listener started on 0.0.0.0:4723
    info: Console LogLevel: debug
    
    Now you can proceed with developing/executing android or iOS automated tests using appium.
    Happy testing!!!