Tuesday, March 14, 2017

Record iPhone or iPad Device Screen and Capture App Log in Mac

Recording device(iPhone/iPad) Screen
 
Sometimes we need to record the mobile device screen for reference of bug verification or capturing an automation run. Recording the device screen is not a difficult step.

There is a default app in Mac by which you can easily record your iPhone or iPad screen. So you don't need to install any other app to do this. The default app which does this is "QuickTime Player"

Steps to record screen:
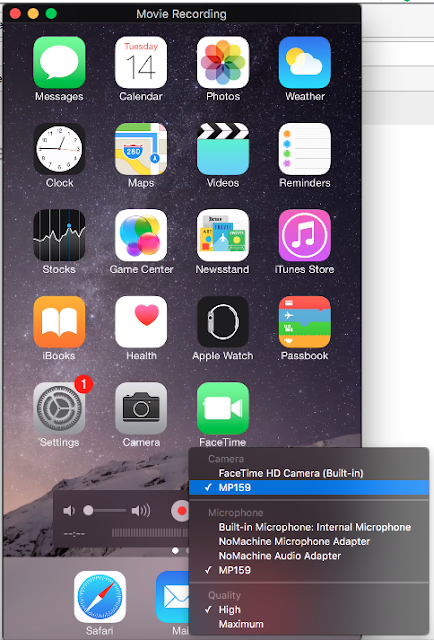
  • Plug-in the iPhone/iPad device to your Mac
  • Open "QuickTime Player" in your Mac
  • Start a new movie recording(Right click on the icon from the Dock > select "New Movie Recording")
  • On the record menu(arrow right to the red circle) select the device id under the Camera and Microphone section) - as shown in the below image
  • The screen now should be resized to the device screen size
  • Click on the record button(red circle) to start the recording
  • Do any actions that you want to perform in the device to record
  • Click on the stop recording button when you want to stop
  • Save the recording with a name in your local drive
 Note: You can adjust the volume in the volume bar based on the requirement.


Capturing app log in device(iPhone/iPad)

For capturing the application log in the iPhone/iPad device we should have "Xcode" installed in the Mac. Many mac has Xcode installed by default, if not installed then you will have to install it.

Steps to capture log:
  • Plug-in the iPhone/iPad device to your Mac 
  • Open "Xcode" in the system
  • Navigate to "Window" menu and select "devices"
  • In the devices window, select the device name/id from the left panel under the devices
  • In the right panel, click(if the log is not visible) on the upward arrow which shows at the bottom of the right panel of the device window.
  • You will see the running application log in the log panel
  • Clear the log by clicking on the "Clear console" image icon when you don't want the previous log.
  • Click on the "Save Console" image icon to save the log


Capturing screenshots in device(iPhone/iPad)

You can capture the device screenshot in many ways. Below are 2 easy ways to capture screenshot.
  1. Open the device window in Xcode as per the image shown above(follow the previous steps), then click on the "Take Screenshot" button. You will find the screenshot saved in the Desktop.
  2. Press and hold the Sleep/Wake button on the top or side of your device. Immediately press and release the Home button. To find your screenshot, go to the Photos app > Albums and tap Camera Roll.
Note: If you want to take log/screenshot from a simulator, you can select a simulator from the SIMULATORS section and proceed with the required steps.

Monday, September 19, 2016

How to fix INSTALL_FAILED_NO_MATCHING_ABIS error while installing apk in Genymotion

Genymotion is a faster android emulator(Virtual Android Environment) built on x86 and Virtualbox. Its performance is much better than the Google's Android SDK Emulator as it is not an ARM emulator.

However in the latest Genymotion updates, they have removed both the ARM Translation and Google Play Apps. So, when you are trying to install an app which has native libraries but doesn't have a native library for your CUP architecture. For example, if an app is compiled for armv7 and we try to install it on the emulator that uses the Intel architecture instead, it will not work and will give you an error INSTALL_FAILED_NO_MATCHING_ABIS .

To make the app to work in both the CPU architectures, we need to install the ARM Translation.
Steps for installation:
  1. Download the ARM Translation from the link Genymotion-ARM-Translation_v1.1.zip
  2. Open the Genymotion emulator and be in the home screen
  3. Install the downloaded ARM Translation. To installed just you need to drag and drop the zip file in the Genymotion emulator window. Click 'Ok' if it prompts after the 'file transfer in progress' operation
  4. Restart the Genymotion emulator(using adb or close and open)
Now install the application(by using adb or just drag and drop the apk into the emulator window), you shouldn't see any error such as INSTALL_FAILED_NO_MATCHING_ABIS and the application should be installed successfully.

Hope it helps!

Monday, August 01, 2016

Selenium 3(beta) Released!

Selenium 3.0 would be a widely used tool for user-focused automation of mobile and web apps, is expected to be released by Christmas, 2016.

Please watch the video by Simon Stewart, the Selenium project lead and inventor of WebDriver for more details , at  https://m.youtube.com/watch?v=bistojJPR98

Selenium 3 beta released
The beta version of selenium 3 is now released. You can download from
http://www.seleniumhq.org/download/

IMPORTANT CHANGES
* Minimum java version is now 8+
* The original RC APIs are only available via the leg-rc package.
* To run exported IDE tests, ensure that the leg-rc package is on the classpath.
* Support for Firefox is via Mozilla's geckodriver. You may download this from https://github.com/mozilla/geckodriver/releases
* Support for Safari is provided on macOS (Sierra or later) via Apple's own safaridriver.
* Support for Edge is provided by MS: https://developer.microsoft.com/en-us/microsoft-edge/tools/webdriver/ 
* Official support for IE requires version 9 or above. Earlier versions may work, but are no longer supported as MS has end-of-lifed them.
Other major changes: 
* New html-table runner backed by WebDriver.
* Unused command line arguments are now no longer parsed.

Check below link for the latest updates
https://raw.githubusercontent.com/SeleniumHQ/selenium/master/java/CHANGELOG

Keep on watching the official website for latest updates at
http://www.seleniumhq.org/

Thank you!

Sunday, April 10, 2016

Regular expressions in test automation

In many of the test scenarios, we need to validate the UI text where the text or partial of it is dynamic. In such cases, we need to use regular expressions to validate the text. Below are few example which can help you.

Example - 1
Suppose you want to validate a pattern 'CHICAGO, IL 60603 (1 mi)'. Where 'CHICAGO, IL' is the location and it follows with a zip and in braces single digit indicating distance in miles. If in this string the location string is as per the preferences or settings that you have made in your application and other part of the string you need to validate, you can write a regular expression as below:
public static boolean validateLocation(String location, 
                             String locationWithZipAndDistance) {
 String locationPattern = location + " [0-9]{5} \\([0-9]{1} mi\\)";
 // e.g. CHICAGO, IL 60603 (1 mi)
 // where value of 'location' is 'CHICAGO, IL'
 Pattern pattern = Pattern.compile(locationPattern, Pattern.CASE_INSENSITIVE);
 Matcher matcher = pattern.matcher(locationWithZipAndDistance);
 return matcher.matches();
}
Usage:
String searchLocation = "CHICAGO, IL 60603 (1 mi)";
String location = "CHICAGO, IL";
System.out.println(validateLocation(searchLocation, location));// output: true
In the above example it will return true if the input string is in either case as it has compiled with CASE_INSENSITIVE pattern.

Example - 2
If you want to validate a phone number text in the UI with a certain format, for example '(866) 825-3227' then you can use below regular expression
public static boolean validatePhone(String phone) {
 String phonePattern = "\\([0-9]{3}\\) [0-9]{3}\\-[0-9]{4}";
 // e.g. (866) 825-3227
 Pattern pattern = Pattern.compile(phonePattern);
 Matcher matcher = pattern.matcher(phone);
 return matcher.matches();
}
Usage:
String ph = "(866) 825-3227";
System.out.println(validatePhone(ph));// output: true
Example-3
Lets assume you are validating some string with days and time, example 'Mon - Fri: 7:00 AM - 6:30 PM', you can use the regular expression in the following way
public static boolean validateOfficehours(String officeHours) {
 String officeHourPattern = "(?:Sun|Mon|Tue|Wed|Thu|Fri|Sat) - (?:Sun|Mon|Tue|Wed|Thu|Fri|Sat): (?:([0-9]{1,2}:[0-9]{2} (?:AM|PM) - [0-9]{1,2}:[0-9]{2} (?:AM|PM))|Closed)";
 // e.g. Mon - Fri: 7:00 AM - 6:30 PM
 // e.g. Sat - Sun: Closed
 Pattern pattern = Pattern.compile(officeHourPattern);
 Matcher matcher = pattern.matcher(officeHours);
 return matcher.matches();
}
Usage:
String officeHoursWeekday = "Mon - Fri: 7:00 AM - 6:30 PM";
String officeHoursWeekend = "Sat - Sun: Closed";
System.out.println(validateOfficehours(officeHoursWeekday));// output: true
System.out.println(validateOfficehours(officeHoursWeekend));// output: true
These are very basic scenarios, using these you can validate maximum of the dynamic texts. Feel free to ask me if you face any different scenarios which need my help.
For more information, please refer here and also you can check the Pattern class for other available functionalities.

Monday, January 18, 2016

Checking if android emulator or device is running

We can check if an android device or an emulator is attached(plugged in) or running before we start using the attached device.

Command line:
We can check the following command to check list of attached devices
adb devices
The above command will provide you the list of attached devices.
Example output,
List of devices attached 
192.168.56.101:5555 device
emulator-5554 device 
Programmatically:
We can do this check programmatically also as below
private static String sdkPath = "/Applications/adt-bundle-mac-x86_64-20140702/sdk/";
private static String adbPath = sdkPath + "platform-tools" + File.separator + "adb";
/**
 * Checks if an emulator or a device is already launched or plugged in
 * 
 * Example: 

 * List of devices attached 

 * 192.168.56.101:5555 device 

 * emulator-5554 device
 * 
 * @return
 */
public static boolean isEmulatorOrDeviceRunning() {

 try {
  String[] commandDevices = new String[] { adbPath, "devices" };
  Process process = new ProcessBuilder(commandDevices).start();

  BufferedReader inputStream = new BufferedReader(new InputStreamReader(process.getInputStream()));

  String output = "";
  String line = null;
  while ((line = inputStream.readLine()) != null) {
   System.out.println(line);
   output = output + line;
  }
  if (!output.replace("List of devices attached", "").trim().equals("")) {
   return true;
  }
 } catch (Exception e) {
  e.printStackTrace();
 }
 return false;
}
If the device or emulator is just plugged in or launched, it may not be ready though its running, so wait till it gets ready by the post Waiting for android emulator to be ready

Waiting for android emulator to be ready

When we start android emulator(or is already running), we need to ensure its ready for testing and is responding. 

Command line:
This can be ensured by following commands:
adb shell getprop dev.bootcomplete 
We need to wait for the above command till it returns 1
adb shell getprop sys_bootcomplete 
We need to wait for the above command till it returns 1
adb shell getprop init.svc.bootanim
We need to wait for the above command till it returns "stopped"
Note: 1st and 3rd commands are important to check. Maximum case 2nd command will be ready.

Programmatically:
Also can be done programmatically,
private static String sdkPath = "/Applications/adt-bundle-mac-x86_64-20140702/sdk/";
private static String adbPath = sdkPath + "platform-tools" + File.separator + "adb";
/**
 * Waits for the emulator to be ready
 */
public static void waitForEmulatorToBeReady() {
 try {
  String[] commandBootComplete = new String[] { adbPath, "shell", "getprop", "dev.bootcomplete" };
  Process process = new ProcessBuilder(commandBootComplete).start();
  BufferedReader inputStream = new BufferedReader(new InputStreamReader(process.getInputStream()));

  // wait till the property returns '1'
  while (!inputStream.readLine().equals("1")) {
   process.waitFor(1, TimeUnit.SECONDS);
   process = new ProcessBuilder(commandBootComplete).start();
   inputStream = new BufferedReader(new InputStreamReader(process.getInputStream()));
  }

  String[] commandBootAnim = new String[] { adbPath, "shell", "getprop", "init.svc.bootanim" };
  process = new ProcessBuilder(commandBootAnim).start();
  inputStream = new BufferedReader(new InputStreamReader(process.getInputStream()));

  // wait till the property returns 'stopped'
  while (!inputStream.readLine().equals("stopped")) {
   process.waitFor(1, TimeUnit.SECONDS);
   process = new ProcessBuilder(commandBootAnim).start();
   inputStream = new BufferedReader(new InputStreamReader(process.getInputStream()));
  }

  System.out.println("Emulator is ready to use!");
 } catch (Exception e) {
  e.printStackTrace();
 }
}
You can ensure if an emulator or device is already running before using the above method or commands by the post Checking if android emulator or device is running

Stop or kill android emulator programmatically and from command line

If you are looking for starting(or launching) android emulator from command line or programmatically, please refer my post start or launch android emulator programmatically and from command line
Sometimes we need to stop our running emulator(s) to start a new emulator or to execute tests in a real devices or because of some other situation. To stop a running android emulator we can do by following ways:

Manually stop emulator:
Open the running emulator > click on the close button(red cross icon in the top menu bar). The emulator should be closed.

Stop emulator from command line:
Use the following command to kill all running emulators.
adb emu kill
Stop emulator programmatically:
We can close emulators programmatically also. The following code will close all the running emulators.
private static String sdkPath = "/Applications/adt-bundle-mac-x86_64-20140702/sdk/";
private static String adbPath = sdkPath + "platform-tools" + File.separator + "adb";
/**
 * Kills all running emulators
 */
public static void closeEmulator() {
 System.out.println("Killing emulator...");
 String[] aCommand = new String[] { adbPath, "emu", "kill" };
 try {
  Process process = new ProcessBuilder(aCommand).start();
  process.waitFor(1, TimeUnit.SECONDS);
  System.out.println("Emulator closed successfully!");
 } catch (Exception e) {
  e.printStackTrace();
 }
}
Hope it helps!

Start or launch android emulator programmatically and from command line

For executing android tests in android emulator(AVD), we need to start it and ensure its running before our test starts executing. This post will explain you how can we start android emulator from code and from command line(mainly these will be helpful when we configure our test execution jobs in CI tools like Jenkins)

Manually launching emulator:
This can be easily opened from the IDE(eclipse if you are using adt bundle)
Open eclipse > select menu "Windows" > Select "Android Virtual Device Manager" >  select the AVD you want to launch(create an AVD if not yet created) > Click on "Start..." button > Click "Launch" button to launch the emulator > The emulator will launch in a moment

Launching emulator from command line:
The following command will launch the android emulator. Please ensure you have SDK installed and path has set.
emulator -avd <avd_name>
For example,
emulator -avd AVD_for_Nexus_4_by_Google
You can start with many options, for more information please refer here.

Launching emulator programmatically:
You can achieve this in code too. You can execute this script using ProcessBuilder class in java as below.
private static String sdkPath = "/Applications/adt-bundle-mac-x86_64-20140702/sdk/";// or for windows D:/Android/adt-bundle-windows-x86_64-20140702/sdk/
private static String adbPath = sdkPath + "platform-tools" + File.separator + "adb";
private static String emulatorPath = sdkPath + "tools" + File.separator + "emulator";
Please make sure to change the value of "sdkPath" variable to your SDK installation directory.
The following code will start an emulator with the provided AVD name.
 
/**
 * Starts an emulator for the provided AVD name
 * 
 * @param nameOfAVD
 */
public static void launchEmulator(String nameOfAVD) {
 System.out.println("Starting emulator for '" + nameOfAVD + "' ...");
 String[] aCommand = new String[] { emulatorPath, "-avd", nameOfAVD };
 try {
  Process process = new ProcessBuilder(aCommand).start();
  process.waitFor(180, TimeUnit.SECONDS);
  System.out.println("Emulator launched successfully!");
 } catch (Exception e) {
  e.printStackTrace();
 }
}
The 3 minute(180 sec) wait in the above code is to wait for the emulator which can be decreased or increased depending upon your system performance. 

If you want to stop or kill your running emulator, please refer my post Stop or kill android emulator programmatically and from command line

Tuesday, December 15, 2015

Set up Appium for beginners (Android & iOS)

Appium is an open source test automation tool to automate native and hybrid mobile apps. For more details about the tool please go through http://appium.io/

Below are the steps for setting up Appium in your test machine (with Eclipse):

Step-1: Install Java
Ensure you have java installed in your machine. If not installed, please install it as per the below steps.
  1. Download latest java from http://www.oracle.com/technetwork/java/javase/downloads/index.html or from http://java.com/en/download/
  2. Double click on the downloaded file and follow the instructions to finish the installation. Please note the installation directory.
  3. Once java is installed, you need to set the path for java as follows
    For path setting in Windows,
    For path setting in Mac, please follow the below instructions
    • Look for ".bash_profile" in your home folder
    • If hidden files are not shown by default, you won't see this file. So execute below 2 command to show hidden files in mac
    defaults write com.apple.finder AppleShowAllFiles YES
    killall Finder
    
    • Start up Terminal
    • Type "cd ~/" to go to your home folder
    • Type "touch .bash_profile" to create your new file if ".bash_profile" doesn't exist
    • Edit ".bash_profile" with your favorite editor (or you can just type "open -e .bash_profile" to open it in TextEdit.
    • Update the file with the installed java home location as below example format
    set JAVA_HOME=/Library/Java/JavaVirtualMachines/jdk1.8.0_65.jdk/Contents/Home
    export JAVA_HOME=/Library/Java/JavaVirtualMachines/jdk1.8.0_65.jdk/Contents/Home
    export PATH=$PATH:${JAVA_HOME}:${JAVA_HOME}/bin
  4. To test java installation, open your command prompt(in windows) or terminal(in mac) and enter
  5. java -version
    • You will get the version of java you have installed as below example,
    java version "1.8.0_71"
    Java(TM) SE Runtime Environment (build 1.8.0_71-b15)
    Java HotSpot(TM) 64-Bit Server VM (build 25.71-b15, mixed mode)
    
Step-2: Download ADT bundle for Eclipse(Only if you want to test android application, not required for iOS application testing)
  1. You can download adt bundles (e.g. version 2014-07-02) from below sites:
  2. windows 32: https://dl.google.com/android/adt/adt-bundle-windows-x86-20140702.zip
    windows 64: https://dl.google.com/android/adt/adt-bundle-windows-x86_64-20140702.zip
    Mac 64: https://dl.google.com/android/adt/adt-bundle-mac-x86_64-20140702.zip
    Linux 86: https://dl.google.com/android/adt/adt-bundle-linux-x86-20140702.zip
    Linux 64: https://dl.google.com/android/adt/adt-bundle-linux-x86_64-20140702.zip
  3. Extract the downloaded zip file and extract them to a safe folder. Inside the folder you will find 2 folders. One is eclipse and another with SDK for android
  4. Set the PATH for android SDK. 
    • In Windows, create a system variable ANDROID_HOME and append the "tools" and "platform-tools" locations in PATH environment variable
    ANDROID_HOME=D://android/adt-bundle-windows-x86_64-20140702/sdk
    PATH=%ANDROID_HOME%//tools;%ANDROID_HOME%//platform-tools;
    • In Mac, append the below in ".bash_profile" file
    set ANDROID_HOME=/Applications/adt-bundle-mac-x86_64-20140702/sdk
    export ANDROID_HOME=/Applications/adt-bundle-mac-x86_64-20140702/sdk
    export PATH=$PATH:${JAVA_HOME}:${JAVA_HOME}/bin:${ANDROID_HOME}/tools:${ANDROID_HOME}/platform-tools
  5. Then you need to test sdk installation in the system. To do this, navigate to "platform-tools" directory inside sdk from command line or terminal and type command
  6. adb devices
    • You should get the below message in the terminal or command prompt
    * daemon not running. starting it now on port 5037 *
    * daemon started successfully *
    List of devices attached 
    
    • If you won't see "List of devices attached" message in the output, you might not set the sdk path properly. Please check the steps once again and correct the missing ones to get it properly.
  7. If you want latest android versions, open SDK manager and update the required android versions.
Step-3: Install Appium
  1. Open terminal and type below command
  2. sudo chown -R `whoami` /usr/local
    • Click the enter key and enter system password if it asks
    • Note: Sometimes in Mac system, you may get command not found error. Then please ensure the below is added in your ".bash_profile". You can addend at the end of file.
    export PATH=$PATH:/usr/sbin
    export PATH=$PATH:/usr/bin
    export PATH=$PATH:/usr/local/bin
  3. Next type the below command
  4. ruby -e "$(curl -fsSL https://raw.githubusercontent.com/Homebrew/install/master/install)"
    
    • Then click enter and follow the instructions to continue (provide system password is prompts)
    • Note: In mac machine, it may prompt for any dependant software (e.g. xcode) then please click on install, if you want to test an iOS application. If you want to test an android application you don't need to install it.
  5. Next install node by below command
  6. brew install node
    
    • and click enter. It downloads some files and installs them
    • To see node is installed successfully, please type below in command line
    node -v
    
    •  and click enter then you can see the version of the node installed
  7. Install appium by executing below command
  8. npm install -g appium
    
    •  and click enter, it will take some time to download all the appium related installations. 
  9. To test appium installation, use below command
  10. appium
    
    •  and click enter, it will show the version of appium running and will start the appium server from command line.
    info: Welcome to Appium v1.4.16 (REV ae6877eff263066b26328d457bd285c0cc62430d)
    info: Appium REST http interface listener started on 0.0.0.0:4723
    info: Console LogLevel: debug
    
    Now you can proceed with developing/executing android or iOS automated tests using appium.
    Happy testing!!!

Wednesday, October 21, 2015

Hide Soft Keyboard in Android Emulator/Device

There are multiple strategies for hiding the keyboard:

Method -1
There is a direct method available in AndroidDriver (or if you are using appium for mobile test automation, this method is availale in AppiumDriver too)
For example,
AndroidDriver<WebElement>  driver = new AndroidDriver<WebElement>(
    new URL("http://127.0.0.1:4723/wd/hub"), capabilities);
driver.hideKeyboard();

Method-2
You can hide soft keyboard completely(or only for some test specific) by passing the following property to the desired capabilities as below:
DesiredCapabilities capabilities = new DesiredCapabilities();
capabilities.setCapability("unicodeKeyboard", "true");

Method-3
You can hide by clicking different android keys like "Done" or "Back". Here is an example of hiding soft keyboard using BACK key.
driver.pressKeyCode(AndroidKeyCode.BACK);
In some older versions of AndroidDriver you can find below method
((AndroidDriver) driver).sendKeyEvent(AndroidKeyCode.BACK);

Method-4
You can go back by using following code, which will hide your soft keyboard
driver.navigate().back();
This you need to call only after entering text into edit field. For some views or activities, it may go back to the previous activity.

Method-5
You may try the below if it works for you. In some cases this doesn't work well.
HashMap keycode = new HashMap();
keycode.put("keycode", 4);
((JavascriptExecutor)driver).executeScript("mobile: keyevent", keycode);
Method-6
If you have android application code base integrated with your android test base, you can use the below code which will perform based on your current activity.
public void hideSoftKeyboard(Activity activity) {
  InputMethodManager imm = (InputMethodManager)
  activity.getSystemService(Context.INPUT_METHOD_SERVICE);
  imm.hideSoftInputFromWindow(view.getWindowToken(), 0);
}

Monday, October 12, 2015

Start and Stop Appium Server Programmatically

Pre-requisites:
I assume you have installed the followings in your machine already.
Appium is downloaded (latest from here) and setup properly as mentioned here.
Java Development Kit(JDK) is downloaded(refer here) and installed in your machine.

How to Start or Stop appium server programmatically?
Please refer the below class for detailed usage, Hope it is self explanatory.

Method-1:
package appium.base;

import java.io.File;

import io.appium.java_client.service.local.AppiumDriverLocalService;
import io.appium.java_client.service.local.AppiumServiceBuilder;

/**
 * This page models Appium server
 * 
 * @author A. K. Sahu
 *
 */
public class AppiumServer {

 String appiumInstallationDir = "C:/Program Files (x86)";// e.g. in Windows
 //String appiumInstallationDir = "/Applications";// e.g. for Mac
 AppiumDriverLocalService service = null;

 public AppiumServer() {
  File classPathRoot = new File(System.getProperty("user.dir"));
  String osName = System.getProperty("os.name");

  if (osName.contains("Windows")) {
   service = AppiumDriverLocalService.buildService(new AppiumServiceBuilder()
     .usingDriverExecutable(new File(appiumInstallationDir + File.separator + "Appium" + File.separator + "node.exe"))
     .withAppiumJS(new File(appiumInstallationDir + File.separator + "Appium" + File.separator
       + "node_modules" + File.separator + "appium" + File.separator + "bin" + File.separator + "appium.js"))
     .withLogFile(new File(new File(classPathRoot, File.separator + "log"), "androidLog.txt")));

  } else if (osName.contains("Mac")) {
   service = AppiumDriverLocalService.buildService(new AppiumServiceBuilder()
     .usingDriverExecutable(new File(appiumInstallationDir + "/Appium.app/Contents/Resources/node/bin/node"))
     .withAppiumJS(new File(
       appiumInstallationDir + "/Appium.app/Contents/Resources/node_modules/appium/bin/appium.js"))
     .withLogFile(new File(new File(classPathRoot, File.separator + "log"), "androidLog.txt")));

  } else {
   // you can add for other OS, just to track added a fail message
   Assert.fail("Starting appium is not supporting the current OS.");
  }
 }

 /**
  * Starts appium server
  */
 public void startAppiumServer() {
  service.start();
 }

 /**
  * Stops appium server
  */
 public void stopAppiumServer() {
  service.stop();
 }
}

Usage of this class:
AppiumServer service = new AppiumServer();

// Starts appium server
service.startAppiumServer();

// ... your tests are here. 

// Stops appium server
service.stopAppiumServer();
Note: You can call start appium server in the @BeforeSuite configuration method and stop appium server at @AfterSuite configuration methods.

With the above approach of starting appium server, you can get total android log in the provided log file i.e. "androidlog.txt" file inside "log" directory of your project root directory

Method-2
Here is an another way of starting and killing appium server programmatically using command line executions with java's ProcessBuilder class. Refer below class for more details.
Define the below properties and change as per your appium installation.
 String appiumInstallationDir = "C:/Program Files (x86)";
 String appiumNode = appiumInstallationDir + File.separator + "Appium" + File.separator + "node.exe";
 String appiumNodeModule = appiumInstallationDir + File.separator + "Appium" + File.separator + "node_modules"
   + File.separator + "appium" + File.separator + "bin" + File.separator + "Appium.js";
 String appiumServicePort = "4723";
Execute the start and stop commands like we do from command line but here with using java's ProcessBuilder class.
 /**
  * Starts appium server
  */
 public void startAppiumServer() {
  executeCommand("\"" + appiumNode + "\" \"" + appiumNodeModule 
                      + "\" " + "--no-reset --local-timezone");
 }

 /**
  * Stops appium server
  */
 public void stopAppiumServer() {
 executeCommand("cmd /c echo off & FOR /F \"usebackq tokens=5\" %a in" 
  + " (`netstat -nao ^| findstr /R /C:\""
  + appiumServicePort + "\"`) do (FOR /F \"usebackq\" %b in"
  + " (`TASKLIST /FI \"PID eq %a\" ^| findstr /I node.exe`) do taskkill /F /PID %a)");
}
You may need the below class for executing a command line command. This you can do using Runtime.getRuntime().exec(command) also, but I would suggest to use ProcssBuilder as this is recommended.
 /**
  * Executes any command for Windows using ProcessBuilder of Java You can
  * change the first input parameter of ProcessBuilder constructor if your OS
  * is not windows operating system
  * 
  * @param aCommand
  */
 public void executeCommand(String aCommand) {
  File currDir = new File(System.getProperty("user.dir"));
  String line;
  try {
   ProcessBuilder probuilder = new ProcessBuilder("CMD", "/C", aCommand);
   probuilder.directory(currDir);
   Process process = probuilder.start();

   BufferedReader inputStream 
        = new BufferedReader(new InputStreamReader(process.getInputStream()));
   BufferedReader errorStream 
        = new BufferedReader(new InputStreamReader(process.getErrorStream()));

   // reading output of the command
   int inputLine = 0;
   while ((line = inputStream.readLine()) != null) {
    if (inputLine == 0) {
     System.out.printf("Output of the running command is: \n");
    }
    System.out.println(line);
    inputLine++;
   }

   // reading errors from the command
   int errLine = 0;
   while ((line = errorStream.readLine()) != null) {
    if (errLine == 0) {
     System.out.println("Error of the command is: \n");
    }
    System.out.println(line);
    errLine++;
   }

  } catch (IOException e) {
   System.err.println("Exception occured: \n");
   System.err.println(e.getMessage());
  }
 }

With the above method, the server log will be printed in the console as I kept standard output and error statements. You can change to trace these log in a log file if you need it.

Hope it is useful !!

Thursday, August 27, 2015

Dealing with input fields in Selenium WebDriver

I got few requests from people saying few of the input fields are not clearing the existing data though we do clear using clear() method in WebDriver and few of the inputs doesn't accept single quote('), double quote("), slash(\), double slash(\\) etc. 
Please have a look on below examples for resolving such issues.
Lets take an example input web element as below :
WebDriver driver = new FirefoxDriver();
WebElement element = driver.findElement(By.cssSelector("#addressInput"));
Clear Input Fields in Selenium WebDriver:
For clearing an input filed you can use either of the following ways:

Case: 1
element.clear();
Case: 2
element.click();
element.clear();
Case: 3
String oldValue = element.getAttribute("value");
if (oldValue.length() > 0) {
 element.clear();
}
Case: 4
element.click();
element.sendKeys(Keys.CONTROL + "a");
element.sendKeys(Keys.BACK_SPACE);
Case: 5
oldValue = element.getAttribute("value");
for (int i = 0; i < oldValue.length() * 2; i++) {
 element.click();
 element.sendKeys(Keys.DELETE);
 element.sendKeys(Keys.CONTROL + "a");
 element.sendKeys(Keys.BACK_SPACE);
 element.click();
 if (element.getAttribute("value").length() == 0) {
  break;
 }
}

Enter Text to Input Fields in Selenium WebDriver:
For entering various types of inputs to an input web element you can use the following approaches:

Case: 1 - Normal Text
element.sendKeys("Some Text");
Case: 2 - Single quote
element.sendKeys("'");// single quote
Sometimes if you try to enter single quote('), it may not enter if you keyboard setting in the system is changes. For example some smart systems enters 2 single quotes on pressing once or sometimes 2 single quotes shown only after pressing 2 times on the single quote key(i.e. on first time press it won't show a single quote). In such cases try using 2 single quotes as your input to input web elements
element.sendKeys("''");
Case: 3 - Double quote
element.sendKeys("\"");// double quote

// similar to above issue for single quote, same applies to double quotes
element.sendKeys("\"\"'"); 
Case: 4 - Single Slash
element.sendKeys("\\");// single slash(\)
Case: 5 - Double Slash
element.sendKeys("\\\\");// double slash(\\) 
Case: 6 - Special Characters
element.sendKeys("!@#$%^&*()_+}?");// special characters
Case: 7 - Scripts
element.sendKeys("<script>alert('Hello');</script>");// script

Hope this helps!

Saturday, July 04, 2015

Drag and Drop tricks in Selenium

Many of the UI draggable elements can be easily draggable from one place to another place over the web page. 
In some cases though the web element is associated with draggable properties, they won't respond when we do drag action through our selenium code by using Actions class. Below are few of the scenario, which will help you to drag and drop your draggable web elements over the web page.

The draggable elements can be anything with draggable properties associated with. It could be a table header cell or can be draggable div or a frame or etc. Lets take an example of a source element(from which you will start the drag action) and a destination element(at which you will drop by releasing your mouse) as below:
WebDriver driver = new FirefoxDriver();

WebElement fromWebElement =
  driver.findElement(By.cssSelector(".ui-draggable div[title='DragMe']"));
WebElement toWebElement =
  driver.findElement(By.cssSelector(".ui-draggable div[title='DropMe']"));
(1) By using Actions class of Selenium webdriver

Case 1: 

Selenium web driver provides Actions class to do drag and drop actions in the web page.
Actions builder = new Actions(driver);
builder.dragAndDrop(fromWebElement, toWebElement);
This will work for most of the draggable web elements.

Case 2:

In case of some of the draggable web element the below works very well:
Actions builder = new Actions(driver);
Action dragAndDrop =
  builder.clickAndHold(fromWebElement).moveToElement(toWebElement)
    .release(toWebElement).build();
dragAndDrop.perform();
Make sure to call the perform() method at the end like above.

Case 3:

In few website the draggable elements doesn't work with either of the above cases. Then you can try the below:
Actions builder = new Actions(driver);
Action dragAndDrop =
  builder.clickAndHold(fromWebElement).moveToElement(toWebElement, 2, 2)
    .release(toWebElement).build();
dragAndDrop.perform();
You can adjust the xOffset and yOffset values(which is 2 in the above example) as per your requirements

Case 4:

This case is very interesting one which will work anyway for all the types of draggable UI elements in the webpage.
Actions builder = new Actions(driver);
builder.clickAndHold(fromWebElement).moveToElement(toWebElement).perform();
Thread.sleep(2000);// add 2 sec wait
builder.release(toWebElement).build().perform();
In the above code the 2 second wait during the drag and drop action is important. I would suggest use this way only if the above cases are not working for you.

(2) By using Robot class

Case 1:

If any of the above drag and drop actions using selenium doesn't work for you, do the drag and drop using Robot class as below:
Point coordinates1 = fromWebElement.getLocation();
Point coordinates2 = toWebElement.getLocation();

Robot robot = new Robot();

robot.mouseMove(coordinates1.getX(), coordinates1.getY());
robot.mousePress(InputEvent.BUTTON1_MASK);
robot.mouseMove(coordinates2.getX(), coordinates2.getY());
robot.mouseRelease(InputEvent.BUTTON1_MASK);
Thread.sleep(2000);// Give some wait if required(e.g. here 2 sec wait)
Hope it helps you! 

Friday, May 08, 2015

Dealing with <object> tags in selenium webdriver

Many web pages uses <object> tags for embedded object within an HTML document. This element is mainly used to embed SVG elements, multimedia, Java applets, Flash etc.
Many web pages also use the <object> tag to embed another webpage or frames into the HTML document.

Though <object> tags looks slimilar to <iframe>, it won't work if you do switch frame by webdriver (e.g. driver.switchTo().frame(objIDorIndex);)

Here are few scenarios that you can handle using selenium webdriver with javascript/jQuery.

Example - 1: 
widthmm=90.48768097536195 heightmm=49.38127063754128 ... ...
Example - 2: 

Content HTML Viewer
(Case 1) In example-1, if you want to click on a "g" elements of SVG element
WebElement objectTag= findElement(By.xpath("//div[@id='imageholder']//object"));
((JavascriptExecutor) driver).executeScript("return (arguments[0].contentDocument.getElementsByTagName('g')[0]).click()", objectTag);
(Case 2) In example-2, if you want to get the title for assertion, then try as an example given below
List<WebElement> objects = findElements(By.xpath("//div[@class='contentViewer']//object"));
String objectId = objects.get(0).getAttribute("id");
WebDriver driver = getDriver();
JavascriptExecutor js = (JavascriptExecutor) driver;
String text = (String) js.executeScript("return (((document.getElementById('" + objectId + "')).contentDocument).getElementsByClassName('titleText')[0]).innerHTML");
getDriver().switchTo().defaultContent();
(Case 3) In example-2, if you want to get any specific attribute, then try something like below
List<WebElement> objects = findElements(By.xpath("//div[@class='contentViewer']//object"));
String objectId = objects.get(0).getAttribute("id");
WebElement objectTag = findElement(By.id(objectId));
String btnTitle = ((JavascriptExecutor) driver).executeScript("return arguments[0].contentDocument.getElementById('closeText').getAttribute('title')", objectTag).toString();
Assert.assertEquals(btnTitle, "Cancel to close");
(Case 4) In example-2, if you want to do any action inside the iFrame, you can use as below given example
WebElement btnDone = (WebElement) js.executeScript("return ((((document.getElementById('" + objectId
            + "')).contentDocument).getElementsByTagName('iFrame')[0]).getElementById('done'))");
btnDone.click();
Note: I have just gave few examples actions w.r.t my example html code snippet. By referring the above examples you do actions inside <object> tag as per your requirements

Sunday, May 03, 2015

Scroll pages in Selenium Webdriver

Most of the cases Selenium automatically calls the javascript "scrollIntoView" function on any element that you try to interact with. If you know an element exists at the bottom of the page then doing anything with that element (including getting an attribute or hovering over it, etc) will cause the page to scroll.

If the above doesn't work, please do either of the followings:

Scroll to a WebElement:
WebElement element = driver.findElement(By.id("navPanel"));
JavascriptExecutor jsexecutor = (JavascriptExecutor) driver;
jsexecutor.executeScript("arguments[0].scrollIntoView();", element);
(Or)
WebElement element = driver.findElement(By.id("navPanel"));
Coordinates coordinate = ((Locatable) element).getCoordinates();
coordinate.onPage();
coordinate.inViewPort();
(Or)
Point point = element.getLocation();
((JavascriptExecutor) driver).executeScript("return window.title;");
Thread.sleep(6000);
((JavascriptExecutor) driver).executeScript("window.scrollBy(0," + (point.getY()) + ");");

Scroll up the web page:
JavascriptExecutor jsExecutor = (JavascriptExecutor) driver;
jsExecutor.executeScript("scroll(300, 0)"); 
// here x value(horizontal value)'300' can be changed as needed
Scroll down the web page:
JavascriptExecutor jsExecutor = (JavascriptExecutor) driver;
jsExecutor.executeScript("scroll(0, 300)"); 
// here y value(vertical value) '300' can be changed as needed
Scroll to end/bottom of page:
Actions actions = new Actions(driver);
actions.keyDown(Keys.CONTROL).sendKeys(Keys.END).perform();
(Or)
JavascriptExecutor jsExecutor = (JavascriptExecutor) driver;  
jsExecutor.executeScript("window.scrollTo(0,Math.max(document.documentElement.scrollHeight,document.body.scrollHeight,document.documentElement.clientHeight));");
(Or)
JavascriptExecutor jsExecutor = (JavascriptExecutor) driver;
for (int second = 0;; second++) {
  if(second >=60){
    break;
  }
  jsExecutor.executeScript("window.scrollBy(0,750)", ""); 
  Thread.sleep(3000);
}
//y value(vertical length) '750' can be changed as needed

Wednesday, August 20, 2014

Data driven testing in Selenium WebDriver with TestNG using Excel

When we want to implement data driven testing using Excel, you need to understand how to read from an Excel sheet. You can read an Excel sheet by using Apache POI

You need to use the below jars for reading from an excel file. 
  1. poi-3.7-20101029.jar
  2. poi-ooxml-3.7-20101029.jar
  3. poi-ooxml-schemas-3.7-20101029.jar
  4. xmlbeans-2.3.0.jar
  5. dom4j-1.6.1.jar
I am using Apache POI 3.7 but you can download the latest jars from downloads page of Apache POI(http://poi.apache.org/download.html). Make sure you have added all the above jars to your project build path.

An example excel file(either .xslx or .xls formats) is given below:


The below self explanatory class is used for reading any cell of an excel sheet.
//Keywords class DataDrivenExcel.java
package example.aks.data.util;

import java.io.File;
import java.io.FileInputStream;
import java.io.IOException;

import org.apache.poi.hssf.usermodel.HSSFWorkbook;
import org.apache.poi.ss.usermodel.Sheet;
import org.apache.poi.ss.usermodel.Workbook;
import org.apache.poi.xssf.usermodel.XSSFSheet;
import org.apache.poi.xssf.usermodel.XSSFWorkbook;

/**
 * This class allows us the use of an Excel spreadsheet to provide input data to
 * a test or set of tests.
 * 
 * @author A. K. Sahu
 * 
 */

public class DataDrivenExcel {

 private Workbook wb;
 private Sheet ws;

 /**
  * Opens a excel sheet
  * 
  * @param fileName
  *            name of the file where you want data
  * @param sheetName
  *            name of the sheet in the excel file
  */
 public DataDrivenExcel(String fileName, String sheetName) {
  try {
   if (fileName.indexOf("xlsx") < 0) { //for .xls format
    wb = new HSSFWorkbook(new FileInputStream(new File(fileName)));
    ws = wb.getSheet(sheetName);
   } else { //for .xlsx format
    wb = new XSSFWorkbook(fileName);
    ws = (XSSFSheet) wb.getSheet(sheetName);
   }
  } catch (IOException io) {
   System.err.println("Invalid file '" + fileName
     + "' or incorrect sheet '" + sheetName
     + "', enter a valid one");
  }
 }

 /**
  * Gets a cell value from the opened sheet
  * 
  * @param rowIndex
  *            starting with 0 index
  * @param columnIndex
  *            starting with 0 index
  * @return
  */
 public String getCell(int rowIndex, int columnIndex) {
  Cell cell = null;
  try {
    cell = ws.getRow(rowIndex).getCell(columnIndex);
  } catch (Exception e) {
   System.err.println("The cell with row '" + rowIndex + "' and column '"
     + columnIndex + "' doesn't exist in the sheet");
  }
  return new DataFormatter().formatCellValue(cell);
 }
}
The test class that uses the above keywords of the DataDrivenExcel class looks like below which is also self explanatory.
//Usage in the TestNG test class DataDrivenTest.java
package example.aks.data.test;

import java.util.ArrayList;

import org.openqa.selenium.WebDriver;
import org.openqa.selenium.firefox.FirefoxDriver;
import org.testng.annotations.DataProvider;
import org.testng.annotations.Test;

import example.aks.data.util.DataDrivenExcel;

/**
 * This class explains the usage of data driven excel
 * 
 * @author A. K. Sahu
 * 
 */
public class DataDrivenTest {

 @DataProvider(name = "loginToAppWithAllRoles")
 public Object[][] getLoginDataForAllRoles() throws Exception {

  DataDrivenExcel userData = new DataDrivenExcel(
    "D:/workspace/DataDriven/data/SampleExcel.xlsx", "Sheet1");

  ArrayList<Object> dataList = new ArrayList<Object>();

  int i = 1;// excluding header row
  int totalRows = 6;
  while (i < totalRows) {
   System.out.println("loginToAppWithAllRoles : line : " + i);

   Object[] dataLine = new Object[4];
   dataLine[0] = userData.getCell(i, 0);
   dataLine[1] = userData.getCell(i, 1);
   dataLine[2] = userData.getCell(i, 2);
   dataLine[3] = userData.getCell(i, 3);

   dataList.add(dataLine);

   i++;
  }

  Object[][] data = new Object[dataList.size()][];
  for (i = 0; i < dataList.size(); i++)
   data[i] = dataList.get(i);

  return data;
 }

 @Test(dataProvider = "loginToAppWithAllRoles", 
       description = "Login with different roles")
 public void testLogin(String userID, String username, String password,
   String role) {

  WebDriver driver = new FirefoxDriver();

  driver.get("http://yoursiteurl.com");

  // Do required actions using the input data, i am just printing here
  System.out.println("userID:" + userID);
  System.out.println("username:" + username);
  System.out.println("password:" + password);
  System.out.println("role:" + role);

  driver.quit();
 }
}
Similarly, you can use an excel file with .xls format.
Important Note: 
In the above test class we used
Object[] dataLine = new Object[4];
Number here should match with the number of parameters for the test case that using this dataprovider.

The  output after executing the tests looks like below:
TestNG Console

Console output

Note: While you are running the tests if you encounter any problem recheck about the below:
  1. Make sure all the above mentioned jars are added to your build path.
  2. The object size defined in the data provider is equal to the number of parameters defined in the test method.
  3. You are reading an existing cell value with a valid row and column index.

Thursday, June 26, 2014

Page Refresh in Selenium WebDriver

There are many ways that we can refresh a web page in Selenium Webdriver tests. Here are listed some of them: 
1) Using refresh() method of WebDriver
driver.navigate().refresh();
This is most commonly used method. 
2) Using F5 key
driver.findElement(By.name("q")).sendKeys(Keys.F5);
This is also commonly used method. We must use it in any text field of the web page as it uses Send keys method. 
3) Using Actions class of WebDriver
Actions actions = new Actions(driver);
actions.keyDown(Keys.CONTROL).sendKeys(Keys.F5).perform();
4) Using jQuery
JavascriptExecutor js = (JavascriptExecutor) driver;
js.executeScript("history.go(0)");
5) Using navigate( ).to( ) method of WebDriver
driver.navigate().to(driver.getCurrentUrl());
6) Using ASCII code
driver.findElement(By.name("q")).sendKeys("\uE035");

Navigate Back, Forward and to an Url in Selenium Webdriver

Below scenarios explains how we can navigate across the browser for various web pages.
WebDriver driver = new FirefoxDriver();
driver.get("http://aksahu.blogspot.in/");

Navigate to an Url:
driver.navigate().to("http://knowledgebase-wiki.appspot.com/");
This navigates the page to "http://knowledgebase-wiki.appspot.com/"

Navigate Back:
driver.navigate().back();
This navigates back to the previous page "http://aksahu.blogspot.in/"

Navigate Forward:
driver.navigate().forward();
This navigates the page forward to "http://knowledgebase-wiki.appspot.com/"

Friday, May 16, 2014

Array to List and List to Array in Java

While testing web applications we came across many list of elements or an element with list of data. In such cases we may need the following conversation instead of iterating over an array or a list.
 
Please refer the below simple example to convert a string array to a list and vice versa. But be careful about the order of elements, If required you may use collection methods to do so.

Lets take an arry of strings as below
String[] elementsAsArray = new String[]{"ele1","ele2","ele3"};

Array to List:
List arrayAsList = Arrays.asList(elementsAsArray);

List to Array:
String[] listAsArray = arrayAsList.toArray(new String[arrayAsList.size()]);

Sunday, March 16, 2014

Switch between windows or tabs in Selenium Webdriver

Please refer the below set of code to understand how can we switch between different windows in Selenium. Open a web page:
WebDriver driver = new FirefoxDriver();
driver.get("http://aksahu.blogspot.in/");
Open a new window:
WebElement elemLink = driver.findElement(By.linkText("Web Driver"));
Actions actions = new Actions(driver);
actions.moveToElement(elemLink);
actions.contextClick(elemLink).sendKeys(Keys.ARROW_DOWN)
  .sendKeys(Keys.ARROW_DOWN).sendKeys(Keys.ENTER).build()
  .perform();
For opening in a new tab/window see the post Open in new Tab or new Window in Selenium Webdriver

Switch between two tabs or windows:

(1) 
If you want to switch to a specific window, see below:
String windowHandle = driver.getWindowHandle();

Now if you want to switch to second windows use the below code:
for(String winHandle : driver.getWindowHandles()){
    driver.switchTo().window(winHandle);
}
Switch to the parent window:
driver.switchTo().window(windowHandle);

(2)
Or, simply you can do as below to switch between two tabs or windows:
ArrayList tabs = new ArrayList (driver.getWindowHandles());

//Switch to new window
driver.switchTo().window(tabs.get(1));
driver.close();//do some action in new window(2nd tab)

//Switch to main/parent window
driver.switchTo().window(tabs.get(0));
driver.getTitle();//do some action in main window(1st tab)